
📑 Table of Contents ▶
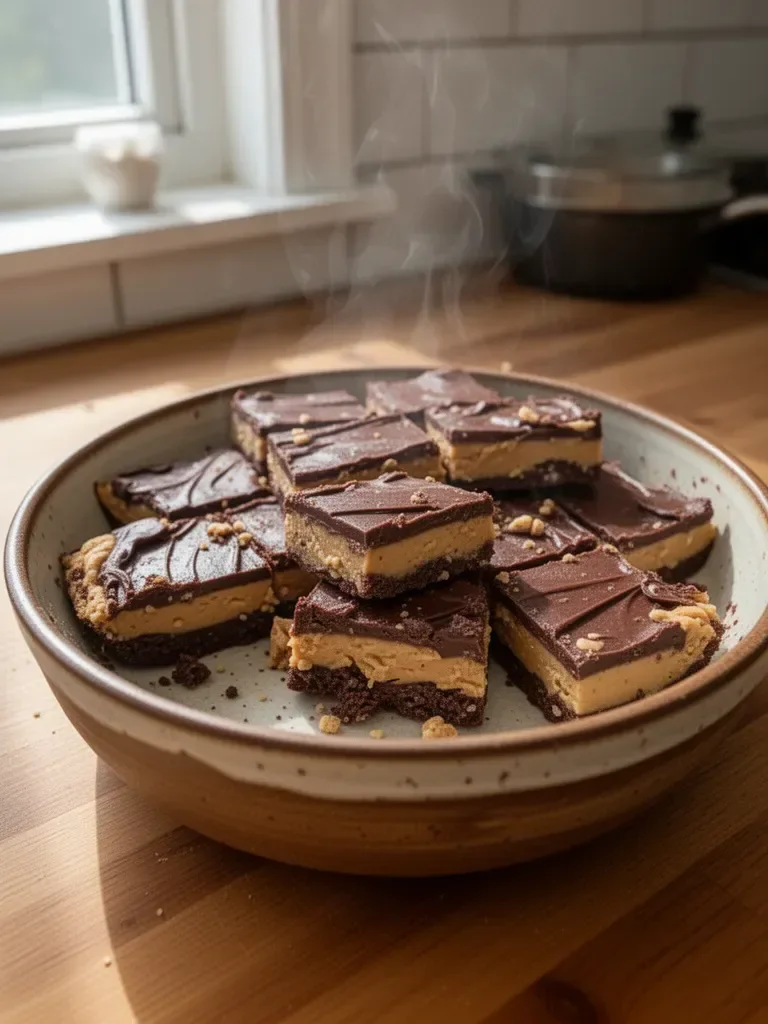
No Bake Chocolate Peanut Butter Bars
I’m Della Lucia, and HealthyDinnerMeals was created from my belief that food should nourish both the body and the moments we share. My fondest memories come from simple homemade meals — not perfection, just comfort, connection, and care. Here, healthy eating stays approachable and satisfying, with recipes that fit real life: quick, flavorful, and balanced.
Imagine a warm afternoon when the aroma of peanut butter wafts through the kitchen, bringing back memories of childhood treats. No Bake Chocolate Peanut Butter Bars evoke that nostalgia, embodying the perfect mix of sweetness and richness. Every bite promises a delightful balance that makes you smile.
These bars blend two favorites: creamy peanut butter and smooth chocolate. With just a handful of ingredients, they come together effortlessly. The joy of preparing them lies in how simple yet satisfying they are. Indulging in this delightful dessert merges convenience with a heavenly flavor experience.
Creating No Bake Chocolate Peanut Butter Bars becomes a cherished memory in itself. Picture gathering with family in the kitchen, vibrant laughter filling the air as you whip up this quick treat. Taste the magic of these bars as you slice them into perfect squares, ready to share with your loved ones.
The Heart of No Bake Chocolate Peanut Butter Bars
Fundamentals
No Bake Chocolate Peanut Butter Bars stand out for their delightful simplicity. By combining key ingredients like peanut butter and chocolate, you create something extraordinary in no time. This beloved dessert aligns beautifully with the notion that simplicity can yield delicious results.
Understanding the essence of no-bake desserts enhances your culinary repertoire. These bars showcase how balance in flavors makes enjoyment effortless. With a few pantry staples, they beckon dessert lovers to unwind and savor each bite.
Preparation/setup
Start by preparing your workspace. Gather your ingredients and line a 9 x 9-inch baking pan with parchment paper. This step ensures easy removal of the bars once they cool. Setting up the area takes mere minutes, yet makes a significant difference in your experience.
As you blend the base ingredients, enjoy the rhythm of culinary creation. Utilize an electric mixer for quick blending. This method saves time and effort. Feel free to use your hands if you prefer a more tactile experience. The key lies in the vibrant combination of peanut butter and melted butter, creating a luscious foundation for your bars.
Ingredients
For these wonderful No Bake Chocolate Peanut Butter Bars, assemble the following ingredients:
- 1 cup peanut butter
- ½ cup butter, melted
- 2 cups powdered sugar
- 1 cup chocolate chips
- 1 tablespoon butter
With this list, you can transform ordinary ingredients into a delightful treat. Each component adds a unique touch, ensuring that these bars deliver flavor-packed satisfaction.
Directions
- Line a 9 x 9 inch baking pan with parchment paper; set aside.
- In a bowl, blend the peanut butter and melted butter using an electric mixer.
- Gradually add in the powdered sugar, blending until just combined.
- Press the mixture into the prepared pan using a rubber spatula or damp hands.
- Refrigerate the base for 20 minutes until slightly firm.
- For the chocolate topping, melt the chocolate chips and 1 tablespoon of butter in a microwave-safe bowl. Use 50% power, stirring every 30 seconds until fully melted.
- Spread the melted chocolate over the cooled bars.
- Refrigerate until hardened, and then cut into small squares.
Mastering the No Bake Technique
Technique
Crafting No Bake Chocolate Peanut Butter Bars requires some essential techniques to achieve optimal results. Understanding the importance of blending ingredients and timing can elevate your dessert game. Enjoy the process, as creating these bars can be a joyful experience.
When it comes to blending, an electric mixer helps streamline the task. It ensures that the peanut butter and butter form a creamy base effortlessly. Mixing in the powdered sugar should remain gentle, just until combined. This technique keeps the mixture light and accessible.
Tips/tricks
Consider a few tips to enhance your No Bake Chocolate Peanut Butter Bars experience. Refrigeration plays a crucial role in achieving the ideal texture. Allowing the base to firm up after pressing it into the pan gives the bars a more coherent structure.
While pouring the melted chocolate over the bars, a spatula helps achieve even coverage. Take your time, as the presentation enhances the overall enjoyment. Forget the stress of baking and revel in the ease of preparing these bars; they promise delightful tastes without the oven.
Perfecting Your No Bake Creation
Perfecting results
Perfecting No Bake Chocolate Peanut Butter Bars involves attention to detail and some practical tricks. The balance of ingredients yields a sweet treat that doesn’t overpower your palate. Always measure accurately to ensure the desired consistency.
Using quality chocolate chips significantly boosts flavor. Opt for semi-sweet chocolate for the most harmonious pairing with the peanut butter base. If you prefer darker chocolate, feel free to substitute without compromising the final result.
Troubleshooting/variations
If your bars turn out softer than expected, simply adjust the powdered sugar next time. A firmer base can make all the difference in that first bite. Consider experimenting with crunchy peanut butter for added texture or using extra chocolate for a richer topping.
Explore various variations by adding ingredients like crushed nuts, graham cracker crumbs, or even sea salt on top of the chocolate. Every choice can lead to a unique twist on your original creation.
The Art of Serving and Storing
Serving/presentation
Presenting No Bake Chocolate Peanut Butter Bars can become an enjoyable part of your experience. Allow them to cool completely in the refrigerator before cutting into squares. This simple step ensures clean edges and an appealing presentation.
As you plate the bars, a sprinkle of crushed peanuts or a drizzle of additional melted chocolate can add charm. Serve alongside fresh fruit or a scoop of ice cream for a delightful contrast in flavors and textures.
Pairings/storage
Storage plays an essential role in extending the life of your No Bake Chocolate Peanut Butter Bars. Keep them in an airtight container in the refrigerator for up to a week. This method maintains their texture and flavor profile.
For those who crave variety, try freezing individual squares. They can serve as a quick treat, ready at a moment’s notice. Simply place in a freezer-safe container, and you’ll have delicious bars available anytime.
Crafting No Bake Chocolate Peanut Butter Bars proves incredibly satisfying, merging nostalgia with modern simplicity. Each bite encapsulates the joy of cooking without the fuss of baking. Whether for yourself or loved ones, these bars invite delightful moments that nourish both body and spirit. Enjoy every bite, and savor the connection they bring around your table.
Print
No Bake Chocolate Peanut Butter Bars
- Prep Time: 10 minutes
- Cook Time: 0 minutes
- Total Time: 30 minutes
- Yield: 16 servings
- Category: Dessert
- Method: No-Bake
- Cuisine: American
- Diet: Vegetarian
Description
Indulge in these easy No Bake Chocolate Peanut Butter Bars that blend creamy peanut butter and smooth chocolate for a nostalgic treat.
Ingredients
- 1 cup peanut butter
- ½ cup butter, melted
- 2 cups powdered sugar
- 1 cup chocolate chips
- 1 tablespoon butter
Instructions
- Line a 9 x 9 inch baking pan with parchment paper; set aside.
- In a bowl, blend the peanut butter and melted butter using an electric mixer.
- Gradually add in the powdered sugar, blending until just combined.
- Press the mixture into the prepared pan using a rubber spatula or damp hands.
- Refrigerate the base for 20 minutes until slightly firm.
- For the chocolate topping, melt the chocolate chips and 1 tablespoon of butter in a microwave-safe bowl. Use 50% power, stirring every 30 seconds until fully melted.
- Spread the melted chocolate over the cooled bars.
- Refrigerate until hardened, and then cut into small squares.
Notes
For best results, refrigerate the bars until serving to keep their shape.