📑 Table of Contents ▶
- Mini Black Forest Cake Fundamentals
- H3: Fundamentals
- H3: Preparation/setup
- H3: Ingredients
- H3: Directions
- Creative Techniques for Mini Black Forest Cakes
- H3: Technique
- H3: Tips/Tricks
- Perfecting Your Mini Black Forest Cake
- H3: Perfecting results
- H3: Troubleshooting/variations
- Serving and Presenting Mini Black Forest Cakes
- H3: Serving/presentation
- H3: Pairings/storage
Easy Mini Black Forest Cake
I’m Della Lucia, and HealthyDinnerMeals was created from my belief that food should nourish both the body and the moments we share. My fondest memories come from simple homemade meals — not perfection, just comfort, connection, and care. Here, healthy eating stays approachable and satisfying, with recipes that fit real life: quick, flavorful, and balanced. Whether you’re cooking for yourself or loved ones, I hope these meals help you feel confident in the kitchen and inspired to enjoy every moment around the table.
Mini Black Forest cake brings back blissful memories of family gatherings where layers of cake, chocolate, and cherries create moments of joy. These delightful mini cakes excite the senses with their luscious chocolate cake base and sweet cherry filling. Imagine the satisfaction as you savor each bite, surrounded by friends and family, sharing stories and laughter. These treats perfectly capture the essence of celebration, making every occasion more special.
Creating these individual-sized cakes feels like a warm embrace. The blend of rich chocolate and tangy cherries unfolds a symphony of flavors that remains unforgettable. Whether it’s a birthday, holiday, or simply a weekend indulgence, everyone loves a sweet surprise. Each bite draws out conversations and builds connections, reminding us all to enjoy the little moments in life.
Baking these mini Black Forest cakes is a fulfilling endeavor that brings happiness right from the kitchen to the dining table. The simplicity of using a box chocolate cake mix makes this recipe accessible to everyone, enabling creativity with flavors and decoration. Embrace the joy of cooking and celebrate togetherness with this delightful treat that will surely leave a lasting impression.
Mini Black Forest Cake Fundamentals
H3: Fundamentals
Understanding the essentials is the first step to mastering the art of baking a mini Black Forest cake. The foundation of this delicious treat lies in the quality of the chocolate cake mix you choose. Opt for a well-known brand to ensure great taste and texture. The eggs and vegetable oil help create a moist cake, while the sour cream adds depth and richness. Each ingredient plays a vital role in enhancing the overall flavor.
Baking these mini cakes requires precise timing and oven temperature. Preheating the oven to a steady 350°F allows for even cooking, ensuring a tender and fluffy cake. Keep an eye on the cakes as they bake, checking for a toothpick to emerge clean. This indicates they are perfectly cooked, ready to cool down before adorning with toppings.
H3: Preparation/setup
Setting up your workspace ensures a smooth baking experience. Gather all your ingredients before starting. Clear your counters, and prepare your mini cake pans by spraying them with non-stick cooking spray. This step prevents the cakes from sticking, making it easier to remove them once cooled. Also, having measuring cups and spoons at hand speeds up the process.
When mixing the batter, use a large bowl to accommodate all your ingredients. Begin by adding the chocolate cake mix, followed by the eggs, vegetable oil, water or milk, and sour cream. Mixing by hand or with an electric mixer brings everything together seamlessly. Incorporate those milk chocolate chips at the end for a sweet surprise hidden within each cake.
H3: Ingredients
Here’s a complete list of ingredients you need to create your mini Black Forest cakes effectively:
- 1 box chocolate cake mix (13.25 ounces)
- 3 large eggs
- ½ cup vegetable oil
- 1 ¼ cup water (or milk)
- ¼ cup sour cream
- 1 cup milk chocolate chips
- ¼ cup heavy cream
- 2 cups whipped topping
- 21 ounces cherry pie filling
These elements combine to create an unforgettable dessert, each contributing distinctive flavors and textures. Let the baking adventure begin with these extraordinary ingredients, ready to reveal a tasty creation.
H3: Directions
- Preheat the oven to 350°F.
- In a large mixing bowl, combine the chocolate cake mix, eggs, vegetable oil, water (or milk), and sour cream. Mix until fully blended.
- Stir in the milk chocolate chips for extra indulgence.
- Pour the batter into your prepared mini cake pans.
- Bake for 15-20 minutes or until a toothpick inserted in the center comes out clean.
- Allow the cakes to cool in the pans for about 10 minutes before transferring them to wire racks to cool completely.
Creative Techniques for Mini Black Forest Cakes
H3: Technique
When baking mini Black Forest cakes, embrace various techniques to elevate your creations. The use of a box cake mix simplifies the process, but a few techniques can enhance texture. Aim for a light and fluffy batter by not overmixing once the ingredients come together. Gentle folding helps retain the air, ensuring a softer cake.
Incorporate the milk chocolate chips delicately into the batter. Distributing them evenly helps avoid clumps, ensuring every cake has that delightful chocolate surprise. When it comes to presentation, you can either layer the cakes with cherry filling or simply top them after baking. Both techniques highlight the delicious blend of chocolate and cherries.
H3: Tips/Tricks
Here are some helpful tips and tricks to ensure your mini Black Forest cakes turn out perfectly every time:
- Use room temperature ingredients. This practice helps create a uniform batter that rises beautifully while baking.
- Experiment with different chocolate chips. Using dark chocolate or semi-sweet varieties can change the flavor profile and add depth.
- Allow the cakes to cool completely before decorating. This cooling period prevents the whipped topping from melting into the cake.
- For added visual appeal, sprinkle some additional chocolate chips on top of the whipped topping before serving.
Implementing these tips will take your baking experience to the next level, transforming your mini Black Forest cakes into a show-stopping delight.
Perfecting Your Mini Black Forest Cake
H3: Perfecting results
To achieve perfect mini Black Forest cakes, focus on the balance of flavors and textures. The richness of the chocolate cake pairs beautifully with the tartness of the cherry filling. Ensure you have enough cherry filling to layer between the cakes, as it enhances every bite with its fruity taste. If you like, add an extra layer of whipped topping on each cake for a pleasing visual.
Baking time is crucial. Always use a toothpick to test for doneness, but be careful not to overbake. Overbaked cakes can become dry and less enjoyable. Allowing the cakes to cool properly will also yield better results, making them easier to work with during decoration.
H3: Troubleshooting/variations
Even the best bakers face challenges at times. If your cakes come out unevenly baked, check that you distributed the batter equally among the mini pans. Oven temperature can also vary, so consider using an oven thermometer to maintain accuracy during baking.
Variations can breathe new life into your mini Black Forest cakes. Consider adding a splash of almond extract or vanilla to the batter for an added flavor dimension. If cherries are not your favorite, other fruits like raspberries or strawberries can substitute seamlessly. Exploring these options allows for creativity and personalization in every bite.
Serving and Presenting Mini Black Forest Cakes
H3: Serving/presentation
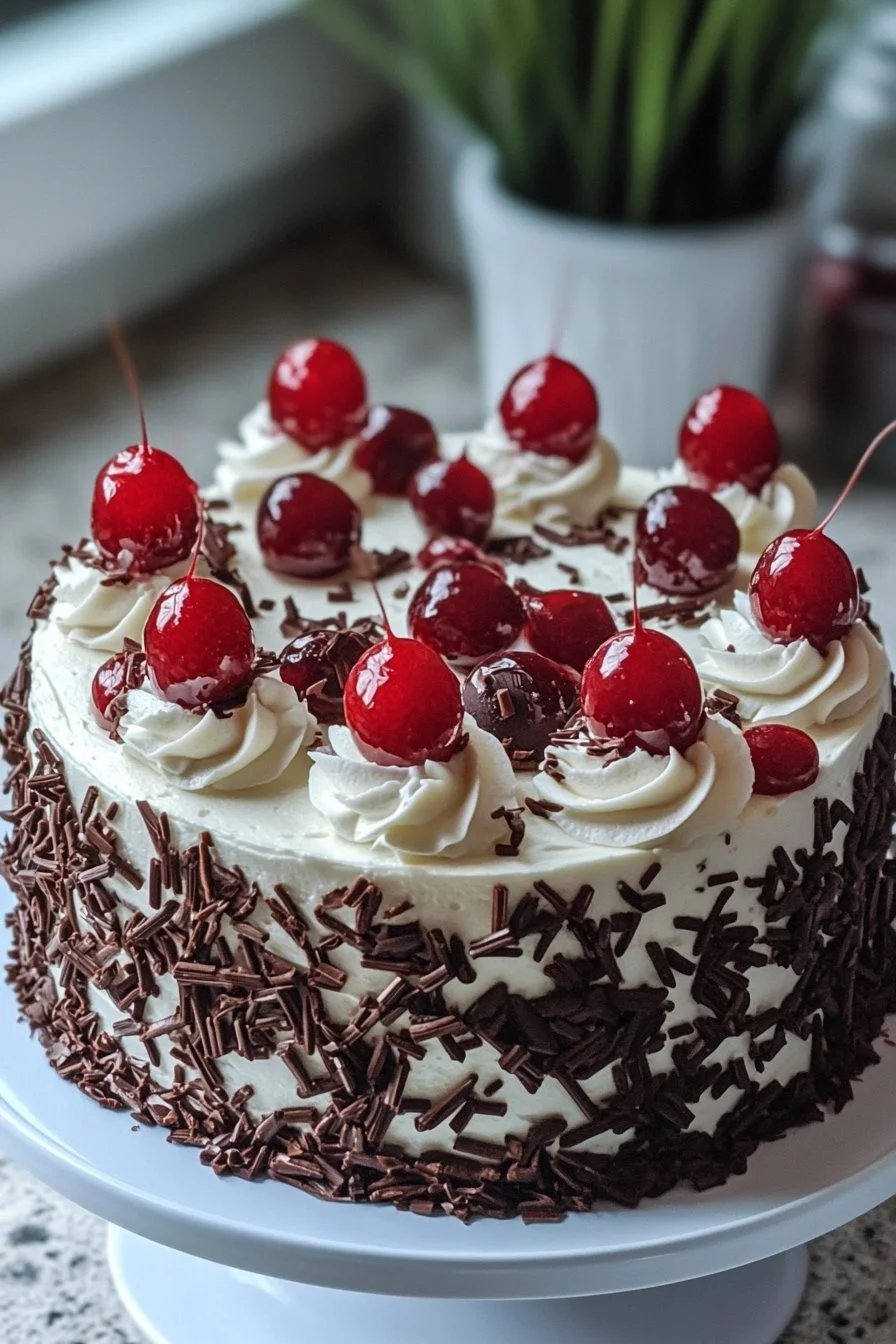
Presentation matters when serving your mini Black Forest cakes. Arrange them on a decorative platter or tiered cake stand for an elegant touch. Stack them with layers of cherry filling in between, allowing the vibrant red cherries to peek through. Top each cake with a delightful dollop of whipped topping and a sprinkle of chocolate chips for visual flair.
For an extra touch, consider garnishing with fresh cherries or chocolate shavings. This simple addition amplifies the luxurious appeal of your cakes and beckons guests to dig in. Enjoy each cake individually, and watch smiles spread around the table.
H3: Pairings/storage
Mini Black Forest cakes pair beautifully with fresh fruits or a scoop of vanilla ice cream. Another delightful accompaniment would be a cup of coffee, balancing the sweetness of the cake. When it comes to storage, place leftover cakes in an airtight container. Store them in the refrigerator for up to three days, ensuring they remain fresh and tasty.
Feel free to prepare the cakes in advance. They hold up well, maintaining their deliciousness even after a couple of days in the fridge. This makes them an excellent choice for parties or special celebrations, allowing you to enjoy time with loved ones instead of spending hours in the kitchen.
In creating these mini Black Forest cakes, you’ve crafted something special – a dessert that brings happiness, connection, and sweet moments into your life and those you care about.
Print
Easy Mini Black Forest Cake
- Prep Time: 10 minutes
- Cook Time: 20 minutes
- Total Time: 30 minutes
- Yield: 8 mini cakes
- Category: Dessert
- Method: Baking
- Cuisine: German
- Diet: Vegetarian
Description
Delightful individual-sized mini Black Forest cakes with layers of chocolate and cherries, perfect for celebrations.
Ingredients
- 1 box chocolate cake mix (13.25 ounces)
- 3 large eggs
- ½ cup vegetable oil
- 1 ¼ cup water (or milk)
- ¼ cup sour cream
- 1 cup milk chocolate chips
- ¼ cup heavy cream
- 2 cups whipped topping
- 21 ounces cherry pie filling
Instructions
- Preheat the oven to 350°F.
- In a large mixing bowl, combine the chocolate cake mix, eggs, vegetable oil, water (or milk), and sour cream. Mix until fully blended.
- Stir in the milk chocolate chips for extra indulgence.
- Pour the batter into your prepared mini cake pans.
- Bake for 15-20 minutes or until a toothpick inserted in the center comes out clean.
- Allow the cakes to cool in the pans for about 10 minutes before transferring them to wire racks to cool completely.
Notes
For added flavor, consider incorporating extracts or swapping out cherry filling with other fruits. Presentation can be enhanced with chocolate shavings or fresh cherries.