
📑 Table of Contents ▶
- Cake in a Jar Fundamentals
- Fundamentals
- Preparation/setup
- Directions
- Creative Techniques for a Cake in a Jar
- Technique
- Tips/tricks
- Perfecting Results with Your Cake in a Jar
- Perfecting results
- Troubleshooting/variations
- Serving and Storing Your Cake in a Jar
- Serving/presentation
- Pairings/storage
- Conclusion
- Cake in a Jar
Cake in a Jar Recipe
I’m Della Lucia, and HealthyDinnerMeals was created from my belief that food should nourish both the body and the moments we share. My fondest memories come from simple homemade meals — not perfection, just comfort, connection, and care. Here, healthy eating stays approachable and satisfying, with recipes that fit real life: quick, flavorful, and balanced. Whether you’re cooking for yourself or loved ones, I hope these meals help you feel confident in the kitchen and inspired to enjoy every moment around the table.
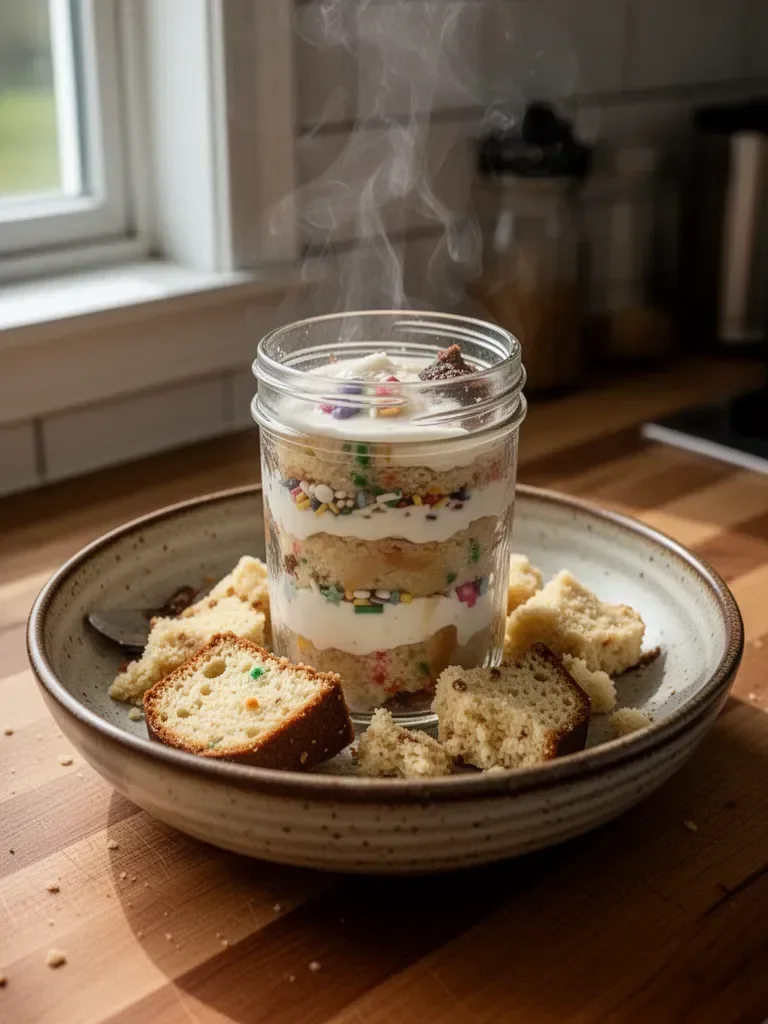
One delightful treat that brings joy to any occasion is a cake in a jar. This adorable dessert not only tastes great but also evokes a sense of nostalgia. Imagine gathering around the kitchen table, each guest reaching for a jar filled with delectable layers of cake and frosting. A cake in a jar becomes more than just dessert; it creates lasting memories. It’s a perfect way to celebrate special moments or simply enjoy a sweet treat on a cozy day.
Creating a cake in a jar is a straightforward process that anyone can master. It’s all about combining simple ingredients with a dash of creativity, yielding something truly special. Get ready to embark on a culinary journey that blends flavors, textures, and colorful sprinkles. This delightful creation captures that whimsical essence of cake while making it easy to share and enjoy. Stay with me as we dive into the world of cakes in jars!
Cake in a Jar Fundamentals
Fundamentals
Making a cake in a jar begins with understanding essential baking concepts. This dessert captures the essence of a traditional cake but in a portable and visually appealing format. The key ingredients work harmoniously to create a moist, tender cake layered with sweet frosting. Using jars for individual servings adds a fun twist to your presentation. This makes it convenient for any gathering, from birthday parties to picnics.
The cake itself forms the heart of this dish. By following the right proportions and using quality ingredients, you ensure each layer bursts with flavor. Additionally, the layering process provides simplicity and visual appeal, showcasing the vibrant colors of the sprinkles. Prepare to impress friends and family alike with this charming dessert that pairs beautifully with gatherings of all sorts.
Preparation/setup
Before diving into the recipe, gather your baking tools and ingredients. Set your oven temperature to 350°F (175°C) while you prepare the batter. Ensure you have baking pans greased and ready for the cake batter. If you haven’t already, gather jars that will hold your cake layers. These can range from mason jars to any clear container you prefer, allowing your guests to see the delicious layers inside.
Next, measure out your ingredients. Make sure your butter and egg whites are at room temperature for optimal blending. It’s crucial to have all your components ready before starting to mix. This setup saves time and ensures a smooth baking experience. Once everything is in place, you’re ready to begin assembling your cake in a jar.
Ingredients
For this delightful cake in a jar, you’ll need:
- 1 ¼ cup all-purpose flour
- 2 tablespoons cornstarch
- ½ teaspoon salt
- 1 teaspoon baking powder
- ½ cup unsalted butter (at room temperature)
- ¾ cup granulated sugar
- 2 large egg whites (room temperature)
- 2 tablespoons canola oil
- ⅓ cup milk (room temperature)
- 1 teaspoon vanilla extract
- ¼ cup rainbow sprinkles for decoration
- 1 stick unsalted butter (room temperature) for frosting
- 1.5-2 cups powdered sugar
- ½ teaspoon vanilla extract for frosting
- 1-2 tablespoons milk or cream for frosting
- A pinch of salt for taste
These ingredients create a moist cake that layers beautifully with the sweet frosting, making each jar an indulgent delight.
Directions
- Preheat the oven to 350°F (175°C).
- In a mixing bowl, whisk together the flour, cornstarch, salt, and baking powder until thoroughly combined.
- In another bowl, cream the butter and sugar together until the mixture is light and fluffy, about 3-5 minutes.
- Add the egg whites, canola oil, milk, and vanilla into the creamed mixture. Blend until all ingredients are well incorporated.
- Gradually add the dry ingredients to the wet mixture, mixing until just combined. Take care not to overmix; gently fold in sprinkles to add color and fun.
- Pour the batter into the greased baking pans evenly and spread it to ensure uniform thickness. Bake for 20-25 minutes or until a toothpick comes out clean when inserted into the center.
- Allow the cakes to cool completely before frosting.
- Once cooled, cut the cakes into cubes. Layer these cubes in jars with frosting, repeating layers as desired.
- Top each jar with additional sprinkles to add a festive touch.
Creative Techniques for a Cake in a Jar
Technique
Creating a cake in a jar opens up numerous creative avenues. Consider experimenting with different flavors of frosting or cake to create unique combinations. By swapping vanilla for chocolate or adding citrus zest, you infuse new dimensions into your dessert. The layering technique allows you to create visually stunning jars that highlight each layer’s vibrancy and texture.
Another technique to consider is the assembly of your jars. Stagger the layers and alternate colors to create an eye-catching effect. Assembling the layers with precision ensures a delightful surprise when guests dive in with their spoons.
Tips/tricks
Several tips can elevate your cake in a jar experience. First, ensure the frosting is the perfect consistency for spreading. If it’s too thick, add a teaspoon of milk or cream to achieve a smoother texture. This allows for easier layering and creates a more appealing presentation.
Use an offset spatula to evenly distribute frosting between layers. This tool helps create clean lines and adds sophistication to your jars. Finally, consider chilling the jars for a bit before serving. This enhances the flavors while providing a refreshing treat to enjoy on a warm day.
Perfecting Results with Your Cake in a Jar
Perfecting results
Striving for the perfect cake in a jar involves attention to detail. First, baking time is crucial. Each oven varies, so check for doneness a few minutes before the suggested time. A perfectly baked cake will spring back when gently pressed and will not wobble.
A good rule of thumb is to let the cake layers cool completely before assembling. If the layers are still warm, the frosting may melt and seep between layers. This could create an undesired texture. Hence, choose patience for the best outcomes.
Troubleshooting/variations
Even when you follow the steps, baking can present challenges. If your cake doesn’t rise properly, check your baking powder freshness. If it’s past its shelf-life, it might not provide the necessary lift. Secure proper measurements when adding to the mix.
Variations also offer a chance to customize your cake in a jar. Try adding fruit between layers for a more refreshing flavor or incorporating nutty elements for added texture. Each adjustment creates a unique experience.
Serving and Storing Your Cake in a Jar
Serving/presentation
Presenting your cake in a jar is part of the fun and creativity. Consider using jars of different sizes to add visual interest. Layering chocolate and vanilla desserts in one jar creates a lovely dual effect. Sprinkle some extra toppings on the top layer to catch the eye.
When serving, place jars on a decorative platter or tiered stand. This invites guests to view their options while enhancing the overall presentation. Encourage loved ones to dig in, savoring every spoonful of the delightful creation inside.
Pairings/storage
While a cake in a jar shines on its own, it pairs beautifully with various options. Serve alongside fresh fruit or whipped cream for a light counterbalance. You might even consider pairing it with a scoop of ice cream to create a decadent dessert experience.
Storing your cake in a jar is simple. Seal the jars tightly to keep the cake moist. They can last in the refrigerator for up to a week. If you plan to store them longer, consider freezing the unassembled layers for later use. This flexibility makes preparing for gatherings easy. Just thaw, assemble, and delight!
Conclusion
Creating a cake in a jar offers a delightful twist on traditional desserts. Anyone can embrace the joy of baking and sharing with simple ingredients and easy steps. The process, from mixing to frosting, is rewarding and fosters connection through shared moments.
This charming treat invites creativity and personalization while serving as a sweet reminder of the connections fostered over food. Each jar becomes a vessel of memories, ensuring that the simple act of baking leads to joy and togetherness for everyone involved. Experiment, share, and enjoy every uplifting moment a cake in a jar brings to your table.
Print
Cake in a Jar
- Prep Time: 15 minutes
- Cook Time: 25 minutes
- Total Time: 40 minutes
- Yield: 4 servings
- Category: Dessert
- Method: Baking
- Cuisine: American
- Diet: Vegetarian
Description
A delightful and portable dessert, perfect for any occasion, featuring layers of moist cake and sweet frosting served in jars.
Ingredients
- 1 ¼ cup all-purpose flour
- 2 tablespoons cornstarch
- ½ teaspoon salt
- 1 teaspoon baking powder
- ½ cup unsalted butter (at room temperature)
- ¾ cup granulated sugar
- 2 large egg whites (room temperature)
- 2 tablespoons canola oil
- ⅓ cup milk (room temperature)
- 1 teaspoon vanilla extract
- ¼ cup rainbow sprinkles for decoration
- 1 stick unsalted butter (room temperature) for frosting
- 1.5-2 cups powdered sugar
- ½ teaspoon vanilla extract for frosting
- 1-2 tablespoons milk or cream for frosting
- A pinch of salt for taste
Instructions
- Preheat the oven to 350°F (175°C).
- Whisk together the flour, cornstarch, salt, and baking powder until thoroughly combined.
- Cream the butter and sugar together until the mixture is light and fluffy, about 3-5 minutes.
- Add the egg whites, canola oil, milk, and vanilla into the creamed mixture. Blend until all ingredients are well incorporated.
- Gradually add the dry ingredients to the wet mixture, mixing until just combined. Fold in sprinkles.
- Pour the batter into greased baking pans evenly and bake for 20-25 minutes or until a toothpick comes out clean.
- Allow the cakes to cool completely before frosting.
- Cut the cakes into cubes and layer in jars with frosting, repeating layers as desired.
- Top each jar with additional sprinkles for decoration.
Notes
Experiment with different flavors of frosting or cake to create unique combinations. Consider chilling the jars before serving for a refreshing treat.