
📑 Table of Contents ▶
- Part 1 — Crafting the Decadent Black Forest Cheesecake
- Fundamentals
- Preparation/Setup
- Directions
- Part 2 — Mastering Techniques for Black Forest Cheesecake
- Technique
- Tips/Tricks
- Part 3 — Fine-Tuning Your Black Forest Cheesecake
- Perfecting Results
- Troubleshooting/Variations
- Part 4 — Presenting Your Decadent Cheesecake
- Serving/Presentation
- Pairings/Storage
Decadent Black Forest Cheesecake
I’m Della Lucia, and HealthyDinnerMeals was created from my belief that food should nourish both the body and the moments we share. My fondest memories come from simple homemade meals — not perfection, just comfort, connection, and care. Here, healthy eating stays approachable and satisfying, with recipes that fit real life: quick, flavorful, and balanced. Whether you’re cooking for yourself or loved ones, I hope these meals help you feel confident in the kitchen and inspired to enjoy every moment around the table.
A warm gathering around a slice of decadent black forest cheesecake creates unforgettable moments. The rich, chocolaty flavor paired with a velvety cherry topping evokes nostalgia of cherished family get-togethers. Baking this cheesecake might feel intimidating, but the steps involved are straightforward and rewarding. Trust me; each bite brings pure bliss.
This dessert combines the classic flavors of a black forest cake into creamy cheesecake form. The chocolate graham cracker crust and luscious cream cheese filling transport you to dessert heaven. Prepare to impress with this delightful recipe that will have your loved ones swooning after every slice.
Harness cooking as a form of connection. The act of creating something special like this black forest cheesecake embodies love and nurturing. As you bring together each ingredient, think about the moments you’ll share over this delectable treat, and let excitement guide you through the process.
Part 1 — Crafting the Decadent Black Forest Cheesecake
Fundamentals
Understanding the essential components of this black forest cheesecake helps set a solid foundation in your baking journey. The cheesecake base combines rich cream cheese, eggs, and cocoa to create a sumptuous filling. To achieve a smooth and creamy texture, you’ll need to utilize a water bath during baking. This method ensures uniform cooking while preventing cracks, achieving that perfect dessert.
A crunch-worthy crust forms the first layer. The chocolate graham cracker or Oreo cookie crumbs provide an excellent balance to the creaminess above. Using either option will deliver a delectable flavor that pairs extraordinarily well with the cherry topping.
Preparation/Setup
To start, preheat the oven to 325°F (160°C). Prepare your 9-inch springform pan by greasing it well; this will help ensure your cheesecake releases easily once baked. While the oven warms up, gather and measure out your ingredients, creating a smooth workflow that saves time.
Next, combine the chocolate graham cracker crumbs, granulated sugar, and melted butter in a medium bowl. Once mixed thoroughly, press this crumb mixture firmly into the bottom of the springform pan to form the crust. Bake this crust for about 10 minutes, allowing it to set and cool before adding the creamy filling.
Ingredients
For this indulgent black forest cheesecake, you will need the following ingredients to capture its divine flavor:
- 1 1/2 cups chocolate graham cracker crumbs (or Oreo cookie crumbs)
- 1/4 cup granulated sugar
- 1/2 cup unsalted butter, melted
- 3 (8-ounce) packages cream cheese, softened
- 1 cup granulated sugar
- 1/2 cup unsweetened cocoa powder
- 3 large eggs
- 1/2 cup sour cream
- 1/2 tsp vanilla extract
- 1 cup semi-sweet chocolate chips, melted and cooled slightly
- 1 (21-ounce) can cherry pie filling
- 1/2 cup heavy cream
- Fresh cherries or maraschino cherries for garnish
- Whipped cream for garnish
- Chocolate shavings for garnish
Directions
- Preheat your oven to 325°F (160°C) and grease a 9-inch springform pan.
- In a medium bowl, combine the chocolate graham cracker crumbs, granulated sugar, and melted butter. Mix until combined, then press firmly into the bottom of the pan to form the crust. Bake for 10 minutes and set aside to cool.
- In another bowl, beat the softened cream cheese until smooth. Add 1 cup of granulated sugar and cocoa powder, mixing until fully combined.
- Gradually add the eggs, one at a time, mixing on low speed after each addition.
- Fold in sour cream and vanilla extract. Mix in the melted chocolate chips to achieve a smooth consistency.
- Pour this filling over the cooled crust layer.
- Place the cheesecake pan inside a larger baking dish and fill the outer dish with hot water, creating a gentle steam environment.
- Bake at 325°F (160°C) for 55-60 minutes until the edges are set, and the center remains slightly jiggly.
- Turn off the oven and let the cheesecake cool for one hour before transferring it to the refrigerator to chill for at least four hours, or overnight for best results.
Part 2 — Mastering Techniques for Black Forest Cheesecake
Technique
Using the water bath method when baking this cheesecake is essential to achieving a crack-free surface. The steam enveloping the cheesecake as it bakes allows the dessert to cook gently. Always wrap your springform pan in aluminum foil to prevent water from seeping in. This technique will uphold the integrity of the cheesecake, ensuring it remains moist and tender.
Implementing proper mixing techniques also plays a pivotal role. Avoid over-mixing, especially after adding eggs, to prevent incorporating too much air into the batter. Overly aerated cheesecake may rise too much in the oven, leading to cracks once it cools.
Tips/Tricks
To enhance the richness of your black forest cheesecake, consider using premium-quality semi-sweet chocolate. The melted chocolate will add depth to the filling, providing an indulgent flavor.
Don’t forget to chill your cheesecake thoroughly. The cooling process is essential in developing the right texture. For optimal results, leave it in the refrigerator overnight.
When you’re ready to serve, prepare your cherry topping in advance. The mixture of cherry filling along with fresh fruits creates a stunning presentation. A sprinkle of chocolate shavings and whipped cream makes it an exquisite dessert option that impresses guests.
Part 3 — Fine-Tuning Your Black Forest Cheesecake
Perfecting Results
Each step in this cheesecake recipe builds upon the last, ensuring a smooth and decadent outcome. Achieving that creamy filling involves precise mixing and the right baking environment. Following the instructions closely provides the perfect foundation.
Monitor your cheesecake as it bakes. The edges should set while the center retains a slight jiggle. Keep in mind that your cheesecake will continue to set as it cools, so it’s okay if it looks a little wobbly when you remove it from the oven.
Troubleshooting/Variations
Should cracks appear on your cheesecake, don’t despair. While aesthetics matter, they don’t detract from the flavor. A well-made ganache or whipped cream layer can disguise imperfections beautifully.
If you’re interested in variations, consider adding elements like almond extract to the base for an added layer of flavor. You could also swap out the cherry pie filling for other fruits like blueberries or raspberries, offering new taste experiences while preserving the foundational recipe.
Part 4 — Presenting Your Decadent Cheesecake
Serving/Presentation
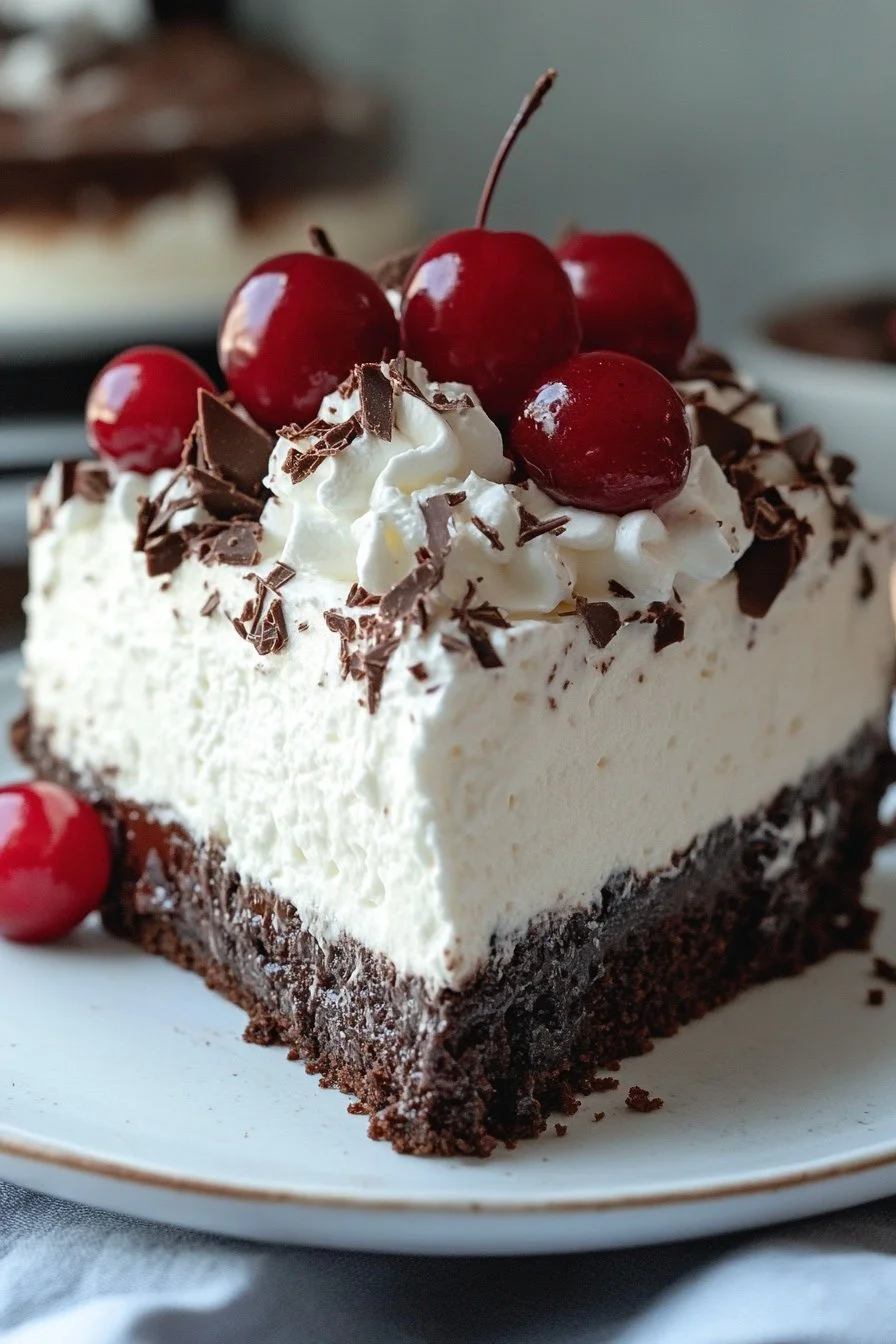
Presentation elevates dessert experiences. As you prepare to serve, remove the springform pan carefully, ensuring the cheesecake retains its shape. Spread the cherry pie filling across the top of the cheesecake, allowing the vibrant color to pop against the rich chocolate filling.
Garnishing with fresh cherries or maraschino cherries creates an eye-catching display that entices. A dollop of whipped cream adds a lightness that complements the deeper flavors of chocolate and cherries. Finish it off with chocolate shavings for that extra touch of elegance that excites any dessert lover.
Pairings/Storage
Enjoy this cheesecake as a delightful end to any meal. Since it pairs beautifully with light beverages like coffee or hot cocoa, consider serving a cup alongside.
For storage, keep your remaining cheesecake wrapped tightly in the refrigerator. Covered properly, it will last for about a week, allowing you to indulge in its deliciousness over several days.
Avoid freezing once garnished, as thawing can affect the texture of both the cheesecake and its toppings. When you share this decadent black forest cheesecake, you create memories that last just as long as the dessert itself.
In every slice, you’ll discover a delightful harmony of flavors and textures, making this black forest cheesecake a cherished treasure in your recipe book. Embrace each moment of the baking process as you create something beautifully delicious, bringing people together around your table.
Print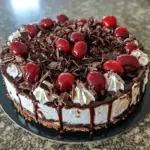
Decadent Black Forest Cheesecake
- Prep Time: 15 minutes
- Cook Time: 70 minutes
- Total Time: 85 minutes
- Yield: 12 servings
- Category: Dessert
- Method: Baking
- Cuisine: American
- Diet: Vegetarian
Description
A rich black forest cheesecake with a chocolate graham cracker crust, creamy filling, and a luscious cherry topping that evokes nostalgia.
Ingredients
- 1 1/2 cups chocolate graham cracker crumbs (or Oreo cookie crumbs)
- 1/4 cup granulated sugar
- 1/2 cup unsalted butter, melted
- 3 (8-ounce) packages cream cheese, softened
- 1 cup granulated sugar
- 1/2 cup unsweetened cocoa powder
- 3 large eggs
- 1/2 cup sour cream
- 1/2 tsp vanilla extract
- 1 cup semi-sweet chocolate chips, melted and cooled slightly
- 1 (21-ounce) can cherry pie filling
- 1/2 cup heavy cream
- Fresh cherries or maraschino cherries for garnish
- Whipped cream for garnish
- Chocolate shavings for garnish
Instructions
- Preheat your oven to 325°F (160°C) and grease a 9-inch springform pan.
- In a medium bowl, combine the chocolate graham cracker crumbs, granulated sugar, and melted butter. Mix until combined, then press firmly into the bottom of the pan to form the crust. Bake for 10 minutes and set aside to cool.
- In another bowl, beat the softened cream cheese until smooth. Add 1 cup of granulated sugar and cocoa powder, mixing until fully combined.
- Gradually add the eggs, one at a time, mixing on low speed after each addition.
- Fold in sour cream and vanilla extract. Mix in the melted chocolate chips to achieve a smooth consistency.
- Pour this filling over the cooled crust layer.
- Place the cheesecake pan inside a larger baking dish and fill the outer dish with hot water, creating a gentle steam environment.
- Bake at 325°F (160°C) for 55-60 minutes until the edges are set, and the center remains slightly jiggly.
- Turn off the oven and let the cheesecake cool for one hour before transferring it to the refrigerator to chill for at least four hours, or overnight for best results.
Notes
Prevent cracks by using the water bath method. For best flavor, chill overnight before serving.