📑 Table of Contents ▶
Chocolate Puff Pastry
I’m Della Lucia, and HealthyDinnerMeals was created from my belief that food should nourish both the body and the moments we share. My fondest memories come from simple homemade meals — not perfection, just comfort, connection, and care. Here, healthy eating stays approachable and satisfying, with recipes that fit real life: quick, flavorful, and balanced. Whether you’re cooking for yourself or loved ones, I hope these meals help you feel confident in the kitchen and inspired to enjoy every moment around the table.
Chocolate puff pastry has a way of evoking childhood memories, don’t you think? From the first moment you bite into a flaky, buttery pastry, the rich chocolate filling brings a rush of happiness. Imagine the aroma wafting through the kitchen, tempting everyone around, pulling them into the moment. It’s the kind of treat you can whip up in no time, perfect for gatherings or a sweet indulgence at home.
Creating delicious chocolate puff pastry doesn’t require culinary expertise. This straightforward recipe uses just a few ingredients and guides you through the process with ease. Who can resist that crispy outer layer paired with molten chocolate? Every bite offers an incredible contrast that satisfies both taste and texture cravings.
With such a simple approach, it’s easy to see why chocolate puff pastry stands out in dessert selections. Every kitchen needs a go-to recipe that delivers with minimal fuss. Whether you need a quick dessert for a last-minute gathering or just something special for yourself, this chocolate puff pastry is sure to impress with its delightful simplicity and rich flavors.
Chocolate Puff Pastry Essentials
Fundamentals
When diving into chocolate puff pastry, understanding the foundation of the ingredients makes all the difference. Store-bought puff pastry is a game-changer. It saves you the time and effort needed to make pastry from scratch. With its unique layers, puff pastry creates that signature fluffy texture that everyone loves.
Choosing the right chocolate also impacts the outcome. You can use dark, milk, or white chocolate, depending on your preference. Each variety brings a different flavor profile, allowing for customization. Don’t forget the egg wash! It provides that gorgeous golden finish, while a sprinkle of sugar gives an extra touch of sweetness.
Preparation/setup
Preparation begins by preheating your oven to 400°F (200°C). This step is crucial for ensuring your pastries bake evenly while developing that crispy exterior. Next, unroll the puff pastry sheets onto a clean surface, making it easy to work with the dough. Cutting each sheet into rectangles paves the way for the perfect pastry shape, yielding 8-10 pieces in total.
Microwave your chocolate until it melts, combining it with a pinch of salt and vanilla extract for more depth in flavor. The warm chocolate fills the center of the rectangles, ready to be enveloped in pastry. Finally, assembling your pastries gives you a sense of accomplishment, knowing that delicious treats are just around the corner.
Ingredients
Here’s what you need to whip up chocolate puff pastry:
- 1 package of store-bought puff pastry (usually contains 2 sheets)
- 100g (about 3.5 oz) of chocolate (dark, milk, or white)
- 1 egg (for egg wash)
- 1 tablespoon of sugar (for optional sprinkling)
- 1 teaspoon vanilla extract (for optional flavor)
- A pinch of salt (to balance sweetness)
- Powdered sugar (for optional dusting)
Gather these ingredients to get started on this delightful treat!
Directions
- Preheat the oven to 400°F (200°C).
- Unroll the puff pastry sheets on a clean surface. Cut each sheet into 4-5 rectangles, resulting in 8-10 rectangles in total.
- Break the chocolate into small pieces and place them in a microwave-safe bowl. Microwave in 20-second intervals, stirring after each, until melted. You can also use a double boiler if preferred. Add vanilla extract and a pinch of salt if using.
- Spoon about one tablespoon of melted chocolate into the center of each rectangular pastry, leaving some space around the edges.
- Fold each pastry rectangle over the chocolate filling to create a sealed packet. Press the edges together to ensure the filling won’t escape. A fork can help crimp and decorate the edges.
- Beat the egg and brush a thin layer over the top of each pastry. Optionally sprinkle a little sugar on top.
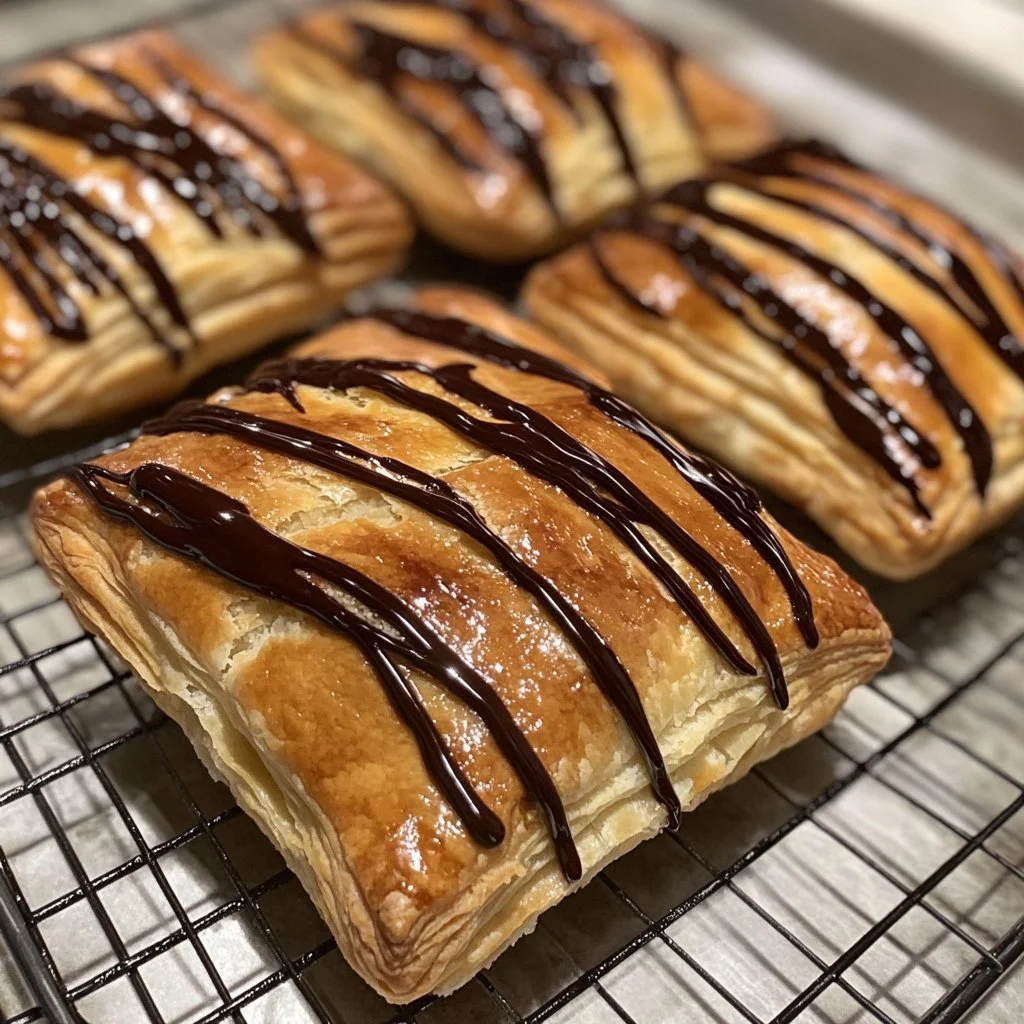
- Place pastries on a parchment-lined baking sheet and bake for 20-25 minutes, or until they turn golden brown and crispy. Watch them closely to prevent over-browning.
- Remove from the oven and cool on a wire rack for a few minutes. Dust with powdered sugar if desired before serving.
Techniques for Chocolate Puff Pastry
Technique
Perfecting chocolate puff pastry involves a few handy techniques. Start by ensuring your puff pastry remains cold while working with it. Warm pastry can lose its flakiness and become difficult to shape. If necessary, place it in the refrigerator for a few minutes before cutting.
Employing the correct technique for sealing the pastry is key. Press down around the edges firmly, ensuring no chocolate can escape during baking. Crimping with a fork adds an aesthetic flair while securing the filling inside. This method guarantees beautifully crafted pastries that hold their shape.
Tips/tricks
Using high-quality chocolate elevates the flavor significantly. Look for chocolate that you enjoy eating straight from the bar, as its taste will shine through in the pastries. Experimenting with flavors can add a twist; try incorporating orange zest or crushed nuts for extra richness and texture.
If you want to make a larger batch, keep in mind that puff pastry freezes well. Prepare the pastries up to the baking stage, then freeze them in an airtight container. When ready to bake, pop them directly in the oven without thawing, adding a couple of extra minutes to the baking time for perfectly baked treats.
Unlocking the Secrets of Chocolate Puff Pastry
Perfecting results
Achieving the perfect puff pastry comes down to a few critical factors. Oven temperature plays a significant role in obtaining that beautifully golden color. If the oven temperature is too low, the pastry may not puff up properly and could become soggy rather than crisp.
Another important element is the baking time. Keep a watchful eye on your pastries towards the end of the baking period. If you notice them browning too quickly, you can cover them loosely with aluminum foil to prevent over-browning while allowing them to cook fully.
Troubleshooting/variations
Should you encounter any issues with your pastries, troubleshooting is simpler than you might think. If the filling leaks during baking, it’s often due to insufficient sealing. Next time, make sure you crimp the edges well!
You can also get creative with variations. Swap out chocolate for fruit preserves, Nutella, or almond paste, customizing the filling to suit personal tastes. Each option provides a new experience, making chocolate puff pastry versatile and appealing to a variety of dessert lovers.
Serving and Storing Chocolate Puff Pastry
Serving/presentation
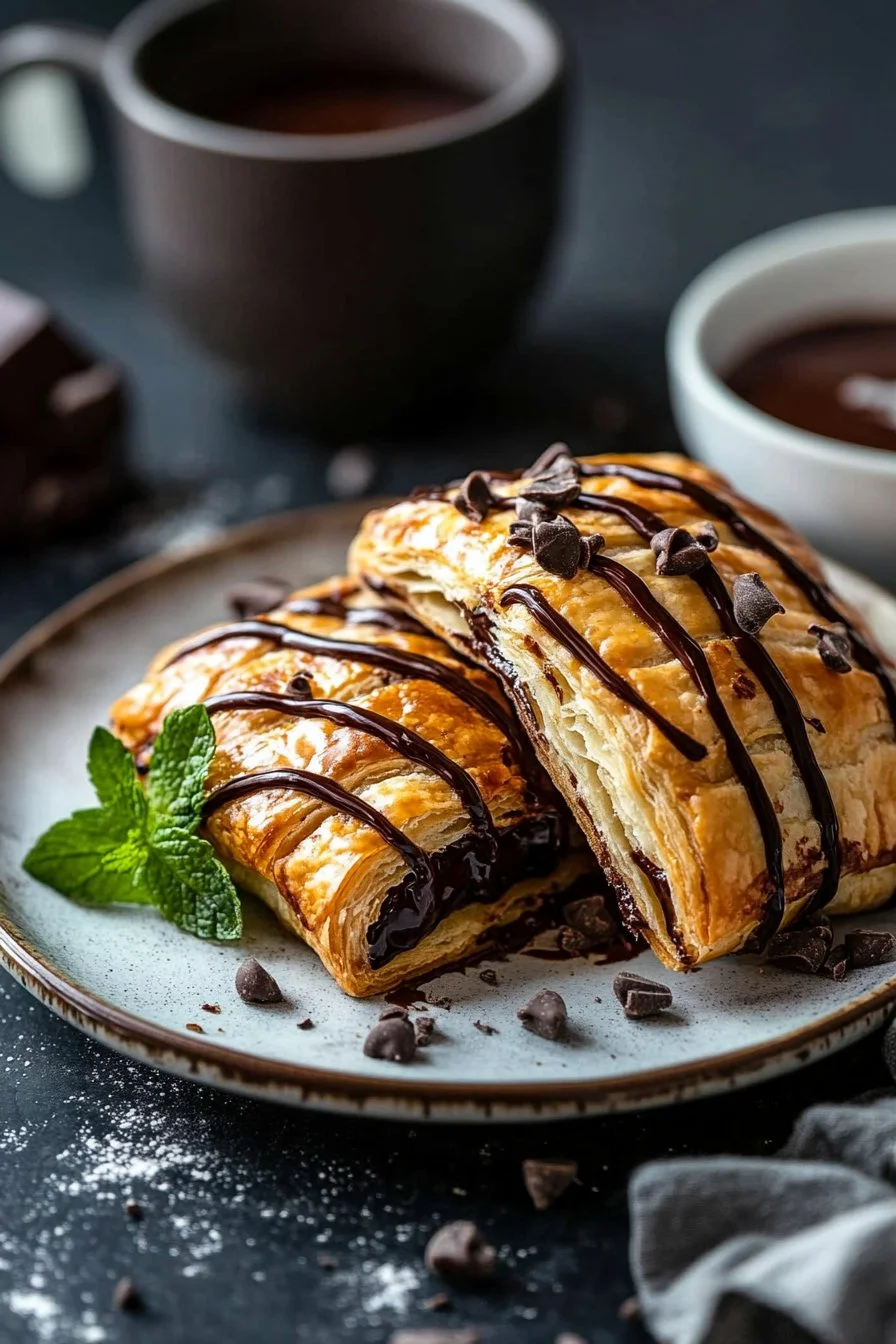
Presenting chocolate puff pastry can transform a simple dessert into an elegant treat. Dusting the finished pastries with powdered sugar adds a touch of sophistication, making them visually appealing. Arrange the pastries on a serving platter, perhaps drizzling melted chocolate on top for an enticing finish.
Consider pairing these pastries with fresh berries or a scoop of vanilla ice cream. The combination of warm pastry and cold ice cream creates a delightful contrast that elevates the entire dessert experience.
Pairings/storage
To maintain the freshness of chocolate puff pastry, store leftovers in an airtight container at room temperature. The texture is best enjoyed the same day they are baked, but if you find yourself with extra pastries, simply reheat them in the oven at 350°F (175°C) for a few minutes before serving.
These delightful treats are perfect for sharing during gatherings or enjoying alone with a warm cup of coffee. Remember, whether it’s for special occasions or just a cozy night in, chocolate puff pastry will never disappoint.
Print
Chocolate Puff Pastry
- Prep Time: 15 minutes
- Cook Time: 25 minutes
- Total Time: 40 minutes
- Yield: 8-10 servings
- Category: Dessert
- Method: Baking
- Cuisine: French
- Diet: Vegetarian
Description
Delightfully flaky pastry filled with rich chocolate, perfect for any gathering or as a sweet indulgence at home.
Ingredients
- 1 package of store-bought puff pastry (usually contains 2 sheets)
- 100g (about 3.5 oz) of chocolate (dark, milk, or white)
- 1 egg (for egg wash)
- 1 tablespoon of sugar (for optional sprinkling)
- 1 teaspoon vanilla extract (for optional flavor)
- A pinch of salt (to balance sweetness)
- Powdered sugar (for optional dusting)
Instructions
- Preheat the oven to 400°F (200°C).
- Unroll the puff pastry sheets on a clean surface. Cut each sheet into 4-5 rectangles, resulting in 8-10 rectangles in total.
- Break the chocolate into small pieces and place them in a microwave-safe bowl. Microwave in 20-second intervals, stirring after each, until melted. Add vanilla extract and a pinch of salt if using.
- Spoon about one tablespoon of melted chocolate into the center of each rectangular pastry, leaving some space around the edges.
- Fold each pastry rectangle over the chocolate filling to create a sealed packet. Press the edges together to ensure the filling won’t escape. Use a fork to crimp and decorate the edges.
- Beat the egg and brush a thin layer over the top of each pastry. Optionally sprinkle a little sugar on top.
- Place pastries on a parchment-lined baking sheet and bake for 20-25 minutes, or until golden brown and crispy.
- Remove from the oven and cool on a wire rack for a few minutes. Dust with powdered sugar if desired before serving.
Notes
Keep pastries cold while working with them for optimal flakiness. Store leftovers in an airtight container at room temperature, best enjoyed the same day.