
📑 Table of Contents ▶
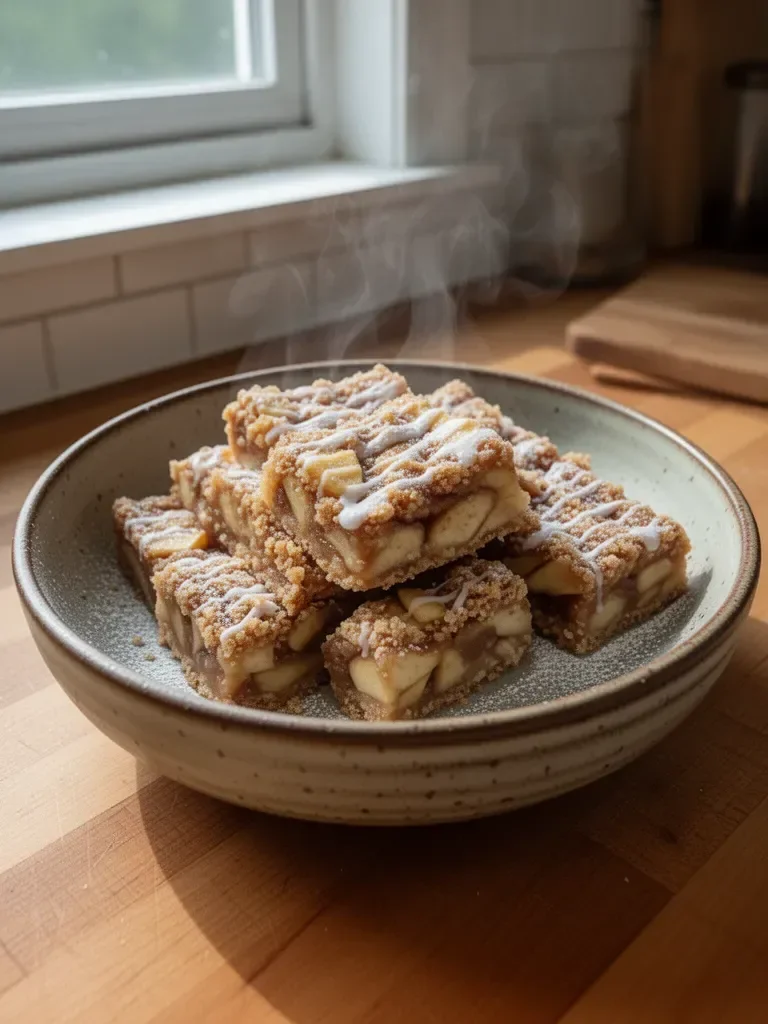
Apple Bars
I’m Della Lucia, and HealthyDinnerMeals was created from my belief that food should nourish both the body and the moments we share. My fondest memories come from simple homemade meals — not perfection, just comfort, connection, and care. Here, healthy eating stays approachable and satisfying, with recipes that fit real life: quick, flavorful, and balanced. Whether you’re cooking for yourself or loved ones, I hope these meals help you feel confident in the kitchen and inspired to enjoy every moment around the table.
Apple bars hold a special place in my heart. Growing up, my family would gather in the kitchen while the sweet aroma of baked apples filled the air. The moment those bars emerged from the oven, everyone flocked to the counter, eager to grab a piece. The delightful crunch of the oat crust combined with the warm, tender apples created a symphony of flavors and textures that felt like home.
These apple bars don’t just make for a satisfying dessert; they also spark connections with loved ones, bridging generations and bringing smiles all around the table. Prepare to indulge in a delightful recipe that captures that essence of comfort and celebration in every bite.
Apple Bars: The Comfort of Flavor
Fundamentals
Apple bars blend simple ingredients to create a harmony of flavors. The base offers a delightful combination of oats and all-purpose flour, complemented by the sweetness of brown sugar and granulated sugar. The warmth of cinnamon and nutmeg adds a fragrant touch, while the apples provide freshness and juiciness.
Understanding the balance of these components is essential. The crust serves as a sturdy foundation and a flavor catalyst, enhancing the overall experience of the bars. Perfecting this balance will elevate your baking game.
Preparation/Setup
Preparation is crucial when crafting your apple bars. Begin by preheating your oven to 350°F. Line a 9×13-inch pan with parchment paper to ensure easy removal once baked. This step saves time and frustration later, making it a crucial part of your setup.
Once your oven heats, gather your ingredients. Having everything ready will streamline the process and make baking an enjoyable endeavor.
Ingredients
For breathtaking apple bars, the ingredients list is vital. Gather the following:
- 2 cups all-purpose flour
- 1 1/2 cups old-fashioned oats
- 1/2 cup granulated sugar
- 3/4 cup brown sugar
- 1 cup unsalted butter, cold and cubed
- 1/2 teaspoon salt
- 1 1/2 teaspoons ground cinnamon
- 1/4 teaspoon nutmeg (optional)
- 3 cups apples, peeled and chopped
- 1 tablespoon lemon juice
- 1 tablespoon cornstarch
- 1 teaspoon vanilla extract
- 1/2 cup powdered sugar
- 1–2 tablespoons milk (for glaze)
Directions
Begin by mixing the flour, oats, both sugars, salt, and cinnamon in a large bowl. The combination of flavors will create a well-rounded base for your bars. Cut in the cold, cubed butter until the mixture resembles coarse crumbs. Reserve 1 ½ cups of this mixture for your topping later.
Press the remaining dough into the prepared baking pan, forming a solid crust. Bake the crust for 10–12 minutes or until it’s lightly golden.
While the crust bakes, prepare the apple filling. In another bowl, combine the chopped apples with lemon juice, cornstarch, and vanilla extract. If desired, add additional cinnamon and nutmeg for an extra depth of flavor.
Once the crust is ready, spread the apple mixture evenly over it. Then sprinkle the reserved topping over the apples, leading to a deliciously textured surface.
Bake the assembled dish for another 30–35 minutes until the top is golden brown and bubbly. Allow it to cool completely before slicing into bars.
For a finishing touch, whisk together the powdered sugar and milk in a small bowl until smooth. Drizzle this glaze over the cooled bars for added sweetness and a beautiful presentation.
Crafting Perfect Apple Bars
Technique
Mastering the technique of making apple bars transforms them into your favorite dessert. Begin by ensuring the butter remains cold while cutting it into the dry mixture. This step leads to a flaky texture that enhances the crust.
Mix your ingredients together gently. Over-mixing can result in tough bars. Instead, aim for a light hand to keep everything pleasantly airy and soft.
Tips/Tricks
A few tips can elevate your apple bars:
-
Use Fresh Apples: Opt for firm, fresh apples for the best flavor and texture. Varieties like Granny Smith, Fuji, or Honeycrisp work wonderfully.
-
Spice It Up: Adjust the spice levels to your liking. If you enjoy more warmth, increase the cinnamon or nutmeg for a richer flavor profile.
-
Chilling the Dough: If time allows, chilling the dough before pressing it into the pan can enhance the texture. Chilled dough ensures that the butter sets quickly in the oven for a perfect crust.
By incorporating these simple tricks, your apple bars will become even more delightful and memorable.
Making Your Bars Perfect
Perfecting Results
To achieve consistently perfect results, keep an eye on your baking times. Every oven is unique — some may bake hotter than others. Check your bars a few minutes before the suggested baking time. A golden brown top is the key indicator they’re ideally baked.
After baking, allowing your apple bars time to cool completely before slicing ensures cleaner cuts. The filling will settle and firm up, making it easier to manage when serving.
Troubleshooting/Variations
If your apple bars don’t turn out as expected, consider common issues:
-
Too Wet: If the filling appears watery, you may have used too much lemon juice. Reduce the amount next time or incorporate additional cornstarch to thicken it.
-
Too Crumbly: If your crust falls apart, ensure you’ve cut the butter in adequately and pressed the mixture firmly into the pan.
Feel free to play with variations of this recipe. Add nuts for extra crunch, try different spices, or mix in dried fruits for different flavor profiles.
Serving Up Apple Bars
Serving/Presentation
Serving apple bars is as delightful as making them. Slice them into squares or rectangles, garnishing with a sprinkle of cinnamon or a dusting of powdered sugar. These finishing touches bring attention to the dessert’s inviting appearance.
Consider serving your apple bars warm or room temperature, as both options bring out their best flavors. Pair them with a scoop of vanilla ice cream for a classic dessert presentation that tantalizes the taste buds.
Pairings/Storage
These apple bars pair wonderfully with a wide array of accompaniments. Enjoy them alongside a dollop of freshly whipped cream or a scoop of your favorite ice cream. They also make for a delightful snack served with a cup of coffee or tea.
For storage, keep cooled apple bars covered at room temperature for up to three days. If you wish to extend their shelf life, you can freeze them for later enjoyment. Wrap individual bars in plastic wrap and place them in an airtight container to keep them fresh.
Apple bars evoke cherished memories and comfort. With their delightful combination of sweet and spicy flavors, they invite joy at any gathering. From the first bite to the last crumb, every bar resonates with the warmth of home and the love of shared moments. Enjoy baking and creating these bars as they elevate your mealtimes and gatherings.
Print
Apple Bars
- Prep Time: 15 minutes
- Cook Time: 45 minutes
- Total Time: 60 minutes
- Yield: 12 servings
- Category: Dessert
- Method: Baking
- Cuisine: American
- Diet: Vegetarian
Description
Delightful apple bars with a crunchy oat crust and warm, tender apple filling, perfect for sharing with loved ones.
Ingredients
- 2 cups all-purpose flour
- 1 1/2 cups old-fashioned oats
- 1/2 cup granulated sugar
- 3/4 cup brown sugar
- 1 cup unsalted butter, cold and cubed
- 1/2 teaspoon salt
- 1 1/2 teaspoons ground cinnamon
- 1/4 teaspoon nutmeg (optional)
- 3 cups apples, peeled and chopped
- 1 tablespoon lemon juice
- 1 tablespoon cornstarch
- 1 teaspoon vanilla extract
- 1/2 cup powdered sugar
- 1–2 tablespoons milk (for glaze)
Instructions
- Preheat your oven to 350°F and line a 9×13-inch pan with parchment paper.
- Mix the flour, oats, both sugars, salt, and cinnamon in a large bowl.
- Cut in the cold, cubed butter until the mixture resembles coarse crumbs. Reserve 1 ½ cups for topping.
- Press the remaining dough into the prepared pan to form a solid crust.
- Bake the crust for 10–12 minutes or until lightly golden.
- Combine chopped apples with lemon juice, cornstarch, and vanilla extract in another bowl.
- Spread the apple mixture evenly over the baked crust.
- Sprinkle the reserved topping over the apples.
- Bake for another 30–35 minutes until golden brown and bubbly.
- Allow to cool completely before slicing into bars.
- Whisk together powdered sugar and milk until smooth; drizzle over cooled bars.
Notes
Use fresh apples for the best flavor and texture. Consider serving with vanilla ice cream.