📑 Table of Contents ▶
- Cherry Blossom Mousse Domes: Fundamentals
- Fundamentals
- Preparation/Setup
- Directions
- Crafting the Cherry Blossom Mousse: Technique
- Technique
- Tips/Tricks
- Perfecting Your Cherry Blossom Mousse Domes
- Perfecting Results
- Troubleshooting/Variations
- Presenting Your Cherry Blossom Mousse Domes
- Serving/Presentation
- Pairings/Storage
Cherry Blossom Mousse Domes
I’m Della Lucia, and HealthyDinnerMeals was created from my belief that food should nourish both the body and the moments we share. My fondest memories come from simple homemade meals — not perfection, just comfort, connection, and care. Here, healthy eating stays approachable and satisfying, with recipes that fit real life: quick, flavorful, and balanced. Whether you’re cooking for yourself or loved ones, I hope these meals help you feel confident in the kitchen and inspired to enjoy every moment around the table.
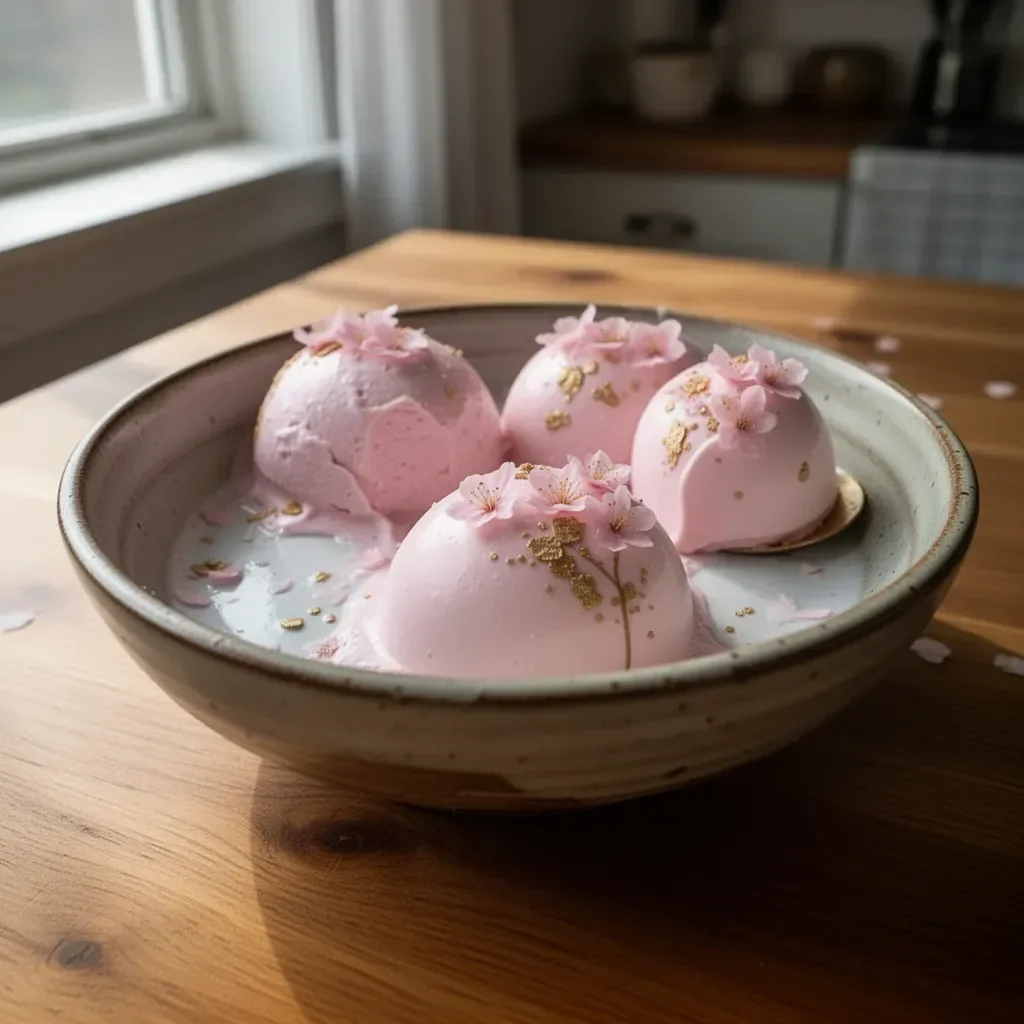
Cherry blossom mousse domes bring that joy to life. The delicate flavors and beautiful presentation instantly revive childhood memories of springtime picnics and blossoming gardens. Each bite offers a delightful balance of sweetness and floral notes, transforming your dessert experience into something ethereal.
Making these mousse domes often feels like creating art in the kitchen. You whip together creamy goodness, and the stunning pink hue beckons the eye to indulge. These domes aren’t just dessert; they become a centerpiece of any gathering, inviting interaction and conversation from loved ones.
Bringing together heavy cream, lush cherry puree, and the enchanting essence of cherry blossom, the mousse domes deliver both charm and taste. These bites of heaven are sure to excite and enchant anyone lucky enough to enjoy them.
Cherry Blossom Mousse Domes: Fundamentals
Fundamentals
Creating cherry blossom mousse domes requires an understanding of several critical fundamentals. First, the process incorporates the delicate technique of blooming gelatin. This step ensures that your mousse holds a perfect shape while maintaining a fluffy texture. The ability to harmonize flavors also plays a significant role in crafting these domes.
You can balance sweet and tart elements to create complexity. The cherry puree adds beautiful depth, while cherry blossom essence elevates the experience to a new level. Knowing your ingredients is essential — high-quality heavy cream and fresh cherries will invariably enhance the flavor of your mousse. Adding seasonal selections to your dessert not only enhances taste but makes it a celebration of nature.
Preparation/Setup
To begin, prepare your workspace and gather all necessary tools and ingredients. It helps to have silicone dome molds ready, as they give the mousse its signature shape. A whisk, a small saucepan, and a mixing bowl will also serve you well. Setting up everything in advance streamlines the cooking process, allowing you to focus on creating something beautiful.
Start by blooming the gelatin in cold water. This simple step will define the texture of your mousse and jelly. Prepare the cherry jelly by simmering cherry puree with sugar and lemon juice; this step brings out the natural sweetness. It forms a gorgeous layer in your mousse domes, marrying together flavor and visual appeal.
Ingredients
Gather the following ingredients to craft your cherry blossom mousse domes:
- 1 1/2 cups heavy cream
- 1/4 cup sugar
- 2 tsp cherry blossom essence or extract
- 1 tsp vanilla extract
- 1 tbsp gelatin powder
- 3 tbsp cold water (for blooming gelatin)
- 1/2 cup cherry puree
- 1 tbsp lemon juice
- 1 tbsp sugar (for cherry jelly)
- 1/2 tsp agar-agar (optional, for firmer jelly)
- 1/2 cup white chocolate (for glaze or decoration)
- Pink food coloring (optional)
- Sponge cake rounds or cookie bases (6 pieces, 2-inch diameter)
Directions
- Start by blooming the gelatin in 3 tablespoons of cold water. Allow it to sit for 5-10 minutes to activate.
- In a small saucepan, combine the cherry puree with 1 tablespoon of sugar, lemon juice, and optional agar-agar if you’d like a firmer jelly. Bring the mixture to a simmer, stirring until thoroughly mixed.
- Add a portion of the bloomed gelatin to the warm cherry mixture. Stir to ensure it dissolves completely.
- Pour the cherry mixture into small molds or an ice cube tray. Freeze until solid, then slice into squares.
- In a separate bowl, whip the heavy cream with 1/4 cup of sugar, cherry blossom extract, and vanilla until soft peaks form.
- Melt the remaining gelatin and gently fold it into the whipped cream mixture.
- Fill the silicone dome molds halfway with the mousse. Insert a piece of frozen cherry jelly into the center of each mold, then top with more mousse to level.
- Cut the sponge or cookie bases into appropriate sizes and gently press them on top.
- Freeze the mousse domes for several hours or overnight until completely firm.
- For the glaze, melt the white chocolate and add pink food coloring if desired. Let it cool slightly.
- Unmold the frozen mousse domes onto a rack and pour the glaze over each dome until fully coated.
- Allow the domes to defrost in the fridge for 1-2 hours before serving.
Crafting the Cherry Blossom Mousse: Technique
Technique
Understanding several techniques enhances the process of crafting your cherry blossom mousse. Whipping the cream properly allows air to incorporate, yielding a light texture. Pay attention to the temperature of the cream; chilled cream whips better and faster, aiding in the preparation.
Blooming the gelatin effectively is another vital technique. It’s essential to add the gelatin to a warm mixture where it can dissolve fully without forming lumps. This simple act can greatly affect the overall texture and stability of your dessert.
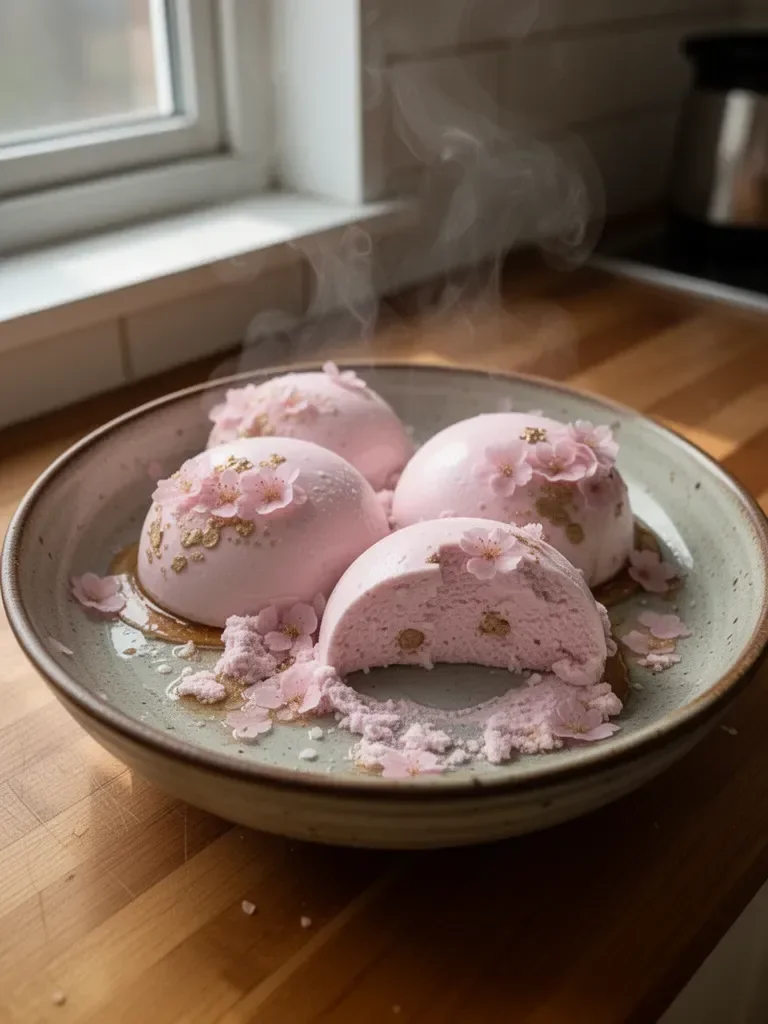
Lastly, layering is an art in itself. Ensuring each component — mousse and jelly — is prepared with care leads to a visually and texturally delightful treat. The clear separation of layers adds an allure that encourages guests to savor every bite.
Tips/Tricks
To achieve the best results, consider these practical tips. When whipping heavy cream, use a chilled bowl and beaters to maximize volume. Avoid over-whipping, which can result in a grainy texture. You want soft peaks that hold their shape without being too stiff.
For the cherry jelly, a hint of lemon juice brightens the overall flavor profile, balancing sweetness. Making the jelly firmer by adding agar-agar can create a more structured jelly that holds its shape even better.
Don’t forget about presentation! A drizzle of melted white chocolate on top not only enhances flavor but also adds elegance. Incorporate fun, small decorations or edible flowers for an extra pop of springtime charm.
Perfecting Your Cherry Blossom Mousse Domes
Perfecting Results
Perfection often lies in the details. To create stunning cherry blossom mousse domes, pay attention to the ingredients. Using high-quality heavy cream can elevate the richness of your mousse. When it comes to cherry puree, choosing ripe cherries imparts a natural sweetness and vibrant flavor.
Executing each step carefully will yield the best results. Allow your mousse to set properly in the freezer, ensuring the base stays intact when you unmold. When pouring the glaze, a steady hand helps achieve a smooth finish on each dome, making them look professionally crafted.
The thickness and consistency of your glaze can further enhance the mousses. A thicker glaze holds a beautiful sheen, while a thinner glaze creates a lovely drip effect. Experimenting with different consistencies can yield delightful visual presentation.
Troubleshooting/Variations
Should something go awry during preparation, troubleshooting can help salvage your mousse domes. If the mousse appears too thin, double-check the ratios when incorporating gelatin. Using enough gelatin ensures a firm yet light texture, critical for a well-formed dome.
If your cherry jelly layers don’t set correctly, consider adjusting the amount of gelatin or agar-agar based on the total liquid content. Remember, cooling your jelly mixture before pouring it into molds is crucial to avoid incorporating air bubbles.
Variations can also inspire creativity. Substitute different fruits for the jelly layer or make the mousse with assorted extracts such as rose or orange blossom. Each variation introduces unique flavors while retaining the enchanting presentation.
Presenting Your Cherry Blossom Mousse Domes
Serving/Presentation
Presenting your cherry blossom mousse domes elegantly enhances the overall dining experience. Select beautiful plates that complement the pastel colors of your dessert. A simple garnish of edible flowers or mint leaves can elevate the presentation further.
When serving, carefully place the domes on the plates to avoid any damage. Consider drizzling a bit of leftover glaze or fresh cherry puree around the edges, adding color and flavor. Matching the decor to a season or theme creates a personalized touch for gatherings.
Pairings/Storage
Pair these delightful mousse domes with a light, fruity sorbet or shortbread cookies for an extra treat. The combination offers balanced textures and tastes while keeping the focus on the bose domes.
For storage, ensure the mousse domes remain covered in the refrigerator if saving for later. Enjoy them within a few days for optimal freshness, as they will retain the best texture and flavor. However, scenarios may arise where you can’t finish them all at once, making thoughtful planning essential.
Once served, these mousse domes often disappear quickly, but knowing how to store any leftovers means you can prolong their delightful enjoyment.
Crafting cherry blossom mousse domes is an experience to treasure. Each layer reflects care and creativity, making every bite a celebration. Whether for a special occasion or a lovely treat at home, these enchanting desserts are bound to impress.
Print
Cherry Blossom Mousse Domes
- Prep Time: 30 minutes
- Cook Time: 15 minutes
- Total Time: 45 minutes
- Yield: 6 servings
- Category: Dessert
- Method: Chilling, Mixing
- Cuisine: American
- Diet: Vegetarian
Description
Delicate cherry blossom mousse domes with a stunning presentation and ethereal flavors, perfect for any gathering.
Ingredients
- 1 1/2 cups heavy cream
- 1/4 cup sugar
- 2 tsp cherry blossom essence or extract
- 1 tsp vanilla extract
- 1 tbsp gelatin powder
- 3 tbsp cold water (for blooming gelatin)
- 1/2 cup cherry puree
- 1 tbsp lemon juice
- 1 tbsp sugar (for cherry jelly)
- 1/2 tsp agar-agar (optional, for firmer jelly)
- 1/2 cup white chocolate (for glaze or decoration)
- Pink food coloring (optional)
- Sponge cake rounds or cookie bases (6 pieces, 2-inch diameter)
Instructions
- Start by blooming the gelatin in 3 tablespoons of cold water. Allow it to sit for 5-10 minutes to activate.
- In a small saucepan, combine the cherry puree with 1 tablespoon of sugar, lemon juice, and optional agar-agar if you’d like a firmer jelly. Bring the mixture to a simmer, stirring until thoroughly mixed.
- Add a portion of the bloomed gelatin to the warm cherry mixture. Stir to ensure it dissolves completely.
- Pour the cherry mixture into small molds or an ice cube tray. Freeze until solid, then slice into squares.
- In a separate bowl, whip the heavy cream with 1/4 cup of sugar, cherry blossom extract, and vanilla until soft peaks form.
- Melt the remaining gelatin and gently fold it into the whipped cream mixture.
- Fill the silicone dome molds halfway with the mousse. Insert a piece of frozen cherry jelly into the center of each mold, then top with more mousse to level.
- Cut the sponge or cookie bases into appropriate sizes and gently press them on top.
- Freeze the mousse domes for several hours or overnight until completely firm.
- For the glaze, melt the white chocolate and add pink food coloring if desired. Let it cool slightly.
- Unmold the frozen mousse domes onto a rack and pour the glaze over each dome until fully coated.
- Allow the domes to defrost in the fridge for 1-2 hours before serving.
Notes
Use high-quality ingredients for the best results. Experiment with different fruit flavors for the jelly layer.